Friday, August 31, 2012

NOTD : Leopard Print Blue Tips

Hey everyone!

It's the weekend again!
Time to pamper ourselves from all the stress school or work gives us!
Why not prettify your nails like I did a few days ago?


Tadaaaaaaaaa!!!

I was in the mood to paint my nails while watching some youtube vids. :P
 

I planned on doing  a gradient look because I wanted to put to use some of my old makeup sponges.

And of course I wanted to practice drawing with my left hand! Haha!
I have this mission in life to be somewhat ambidextrous! Hahaha! :p

See! That's my left hand's nails! 
I'm so proud it turned up well. I'm so proud of myself. LOL

Here are the nail polishes I used in this NOTD.

I applied Pearl Pink first and one coat of Princess.

Then from middle to top, I applied Dare using the makeup sponge and afterwards put Blue Splash on the tips.

Using gold and black acrylic paints, I drew the leopard prints on the blue areas.

Then to finish the look, I added Jocarste 642 on top for the glittery look!

Hope you like this NOTD!

It's quite easy to do if you have the patience and steady hands.


Cheers!
DAWN
 

Thursday, August 30, 2012

Hair Care Haul!

 Hi dearies!

 Today was a happy shopping day for me.
I was at SM San Lazaro looking for some Shampoo and Conditioner but was overwhelmed with the items I saw and my impulse buying syndrome got the best of me.
I didn't even remember that I haven't eaten lunch and was hungry when I got to the mall. LOL


So here are the stuff I bought:

Been seeing a lot of TRESemme ads on TV so I want to try them for myself...
 
Got their Shampoo and Conditioner

 And their treatment mask.
I got them all in anti-hair fall since that's the most serious problem I'm facing with my hair lately.

 Also saw this Caimei Hair Treatment. Not really familiar with it but the packaging looks nice and it's only Php111.00.

 I've been wanting to buy this hair styling set from Watsons. Only Php699! It takes a while to get it heated but at least it has a 1 year warranty! And I won't really use them regularly since I get my hair permed. Its purpose is mostly for the people I do makeovers with. :P

And I also bought a few liners!
 Lip Liner and Eye liner pencil from LA Colors! :)

 Oh! And I got this as a freebie from Watsons. You get this for free if you purchase stuff amounting to a certain price. It looks nice. It comes in blue and brown too! :)

And my most favorite among my purchases...
A book about art!
The artist inside me is screaming of joy. I was at BookSale and I was overwhelmed with all the art books in there. I always complain at the SM San Lazaro branch of their lack of art books and now I complain why I have so little funds to buy them! Haha!

Anyway, that's all I bought. I can't believe how much I'm  spending nowadays. I guess I shall ban myself from going to malls for a while. Haha!


Cheers!
DAWN

HBC has 'Ber Fever!

Hey everyone!

Are you a fan of HBC products like us?

Well, if you are, then you would definitely LOOOOOOOVVVVEEEE that the 'Ber months are coming!

Why? Because of this...


"‘Ber Fever offers up to 70% discount on selected HBC Beauty Exclusive products like San San, Allue, Body Recipe, Hortaleza Professional and Hortaleza, M.D.Offer 
The SALE runs from August 29, 2012 – September 3, 2012."

Awesome, huh?

So go to your nearest HBC branch and go crazy shopping! ♥


Cheers!
DAWN and LIZ


Wednesday, August 29, 2012

Estee Lauder Pure Color Long Lasting Lipstick in Bali Rose

Hello loves!

Just a quick swatch post again! 

This is yet another one of Liz's goodies from her trip to Canada.

Estee Lauder Pure Color Long Lasting Lipstick in Bali Rose

It's one of our few Estee Lauder products.
We don't have much just because we don't have the financial capabilities to splurge on their products. :P

Some details on the box:

Details at the bottom of the tube:

The tube's design is just gorgeous! Very classy... something that looks like royalty!

The color is of soft shimmery rose.

Here's a swatch on my hand

And here are before and after pictures on my lips:

It just gives a healthy glow on my lips!
I love how it smells. It's floral. Not too sure if it's rose though but the scent is very mild! 
It has a glossy finish too and the lasting power is good. It's also easy to apply since it glides smoothly on the lips!
It's something I'd wear in an everyday basis.

Have you tried any Estee Lauder Lipsticks? Which is your favorite?


Cheers!
DAWN

Tuesday, August 28, 2012

Review : The Body Shop Lily Cole Lip & Cheek Dome in Pinch Me Pink

 Hello lovelies!

I know that some of you asked us to create a post regarding this as soon as I blogged about the Limited Edition Lily Cole Makeup Line from The Body Shop. Sorry if it took us a while but here it is!!!

 The Body Shop Lily Cole Lip & Cheek Dome in Pinch Me Pink

BTW, before I proceed with the review, the Lip& Cheek Dome is also available in another shade, Crazy for Coral. Something the peach lovers would enjoy.
 
Anyway, I got this along with some other Lily Cole Makeup Range during the introduction of the Pulse Store of The Body Shop at SM Mall of Asia.

 Here's a description of the product from the Press Release:
 Lip & Cheek Dome
 A creamy gel in an easy-to-use, innovative dome
format can be applied directly onto cheeks or onto lips.
Available in Pinch Me Pink and Crazy For Coral.
 It's also Lily Cole's favorite from the range. :)
 
 I'm not really into cream or gel blushes... I don't even like cheek tints. That is because I have oily skin and these products don't stay long on me. So this wasn't really something that I was excited about when I saw the range. :P


The packaging is cute and quite unique. It really is a dome and the label is very feminine with all the pinks and the cursive font.
 
When I opened the cap, I thought the pink dome was removable. Turns out, it's actually the product! Haha! Sure fooled me because of it's uber shininess! Haha!

It doesn't have a scent and it's not sticky as well.

Pinch Me Pink has a bright pink tone as seen in the following swatches:

 On Paper

 Swiped with my fingers

On my arm

The product is quite sheer too. I needed to apply the product over and over to make it visible enough on my cheeks.

 On my cheek

It gives a very healthy pink glow on my lips too.

 On my lips

I rather use it as a lippie than a blush. Hahaha! I like the results on my lips better. :P

 Used it as a blush and lippie in this picture.

It's very easy to use since you can just apply it directly onto skin. No need to use brushes or other makeup applicators. The thing I don't like about it is since it's cream/gel type, the foundation I have on mixes with it. It really turns me off, especially because it kind of looks unhygienic too. I don't have the gorgeous skin that doesn't need at least some BB cream or foundation on so I really don't like that the product mixes with them.

The lasting power, as I've mentioned before, isn't that good on me since I have oily skin. I'm just not to sure for those who have normal or dry skin.

I also didn't encounter any allergic reaction or any breakouts when I use this.

So to sum it all up!

LIKES:
♥ Comes in 2 shades
♥ Easy to use
♥ Pretty packaging
♥ No annoying scent
♥ Non-sticky
♥ No breakouts or allergies
♥ Cruelty-free
♥ Kind of affordable
♥ Locally available

DISLIKES:
♥ Mixes with my foundie
♥ Doesn't stay long on my skin
♥ Too sheer for me
♥ I generally am not a fan of cream or gel type blushes


Will I buy again?
Nope. Still sticking to powder blushes for me.
It just doesn't suit my oily skin. Though I do believe this would work better with people who have normal skin. Do let me know if you have that skin type and you're using this. :P

Have you tried The Body Shop Lily Cole Lip & Cheek Dome in Pinch Me Pink yet? How about Crazy for Coral? Do you like other products from the TBS Lily Cole line?


Cheers!
DAWN

Monday, August 27, 2012

Tutorial Request : Semi-Spider Lashes

 Heyyyy lovely readers!!!

Almost a month ago, I got a tweet from a dear friend to do a tutorial for this!!!

Tadaaaa!!

Here's her tweet:
As you can see, she asked for a Spider Lashes Tutorial but the title says I only did a Semi-Spider Lashes look. To tell you the truth, it was hard for me to leave my lashes all clumped up together. I just can't do it!! Haha! I don't find it attractive... I'm sorry. So I do hope that my dear friend, Neysa, would be contented with this look that I did for her and I hope you enjoy reading this post.

Spider Lashes is actually something one should avoid when doing her/his makeup. It's when your lashes get all clumpy and stick together looking like actual spider legs. But there are times that this look is sported usually in creative makeup or fashion runway looks.
So on to the tutorial! I want to do a video but I don't have a good video camera and my laptop webcam sucks. Oh well. This will be my first ever makeup tutorial so please be nice. Haha! :)

Start with a clean face!

Curl your lashes with your trusted eyelash curler
(Mine is a Shu Uemura Eye Lash Curler... it's been one of my makeup bestfriends for over 6 years now!).

 Now for the key instrument for this look...


 Get a mascara that volumizes and lengthens. If you don't have any that does both, you can use two mascaras that specializes in each.

I am using Benefit They're Real Mascara which I recently made a review about.

 Apply a quick coat first.


Then concentrate at the base of the lashes to create more volume which will result to this...


And then when it dries, lengthen the lashes and apply 2 or more coats until satisfied... work your way to the corner lashes of your eyes... don't forget to put some on your lower lashes as well!

 I added 2 more coats and got this result.

 This is the most Spider-Lashes-Like look that I would do but can still pass off as something 'wearable'. But if you really want to make it look like SPIDER LEGS then go ahead and apply some more coats of mascara!

 You don't really need to use this brush for this tutorial but if you don't want too many clumps, then, sure, comb away! :P


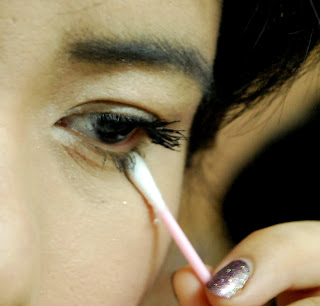
 Using a cotton bud with makeup remover, clean up the messy areas.
 
 I took out some of the flaky areas of my lashes using the comb. I have a feeling that those will eventually fall off and cause some smudging.

But of course, I wouldn't stop there! I'm just that too over-the-top sometimes. :P

 Using a black pencil liner, tight line your eyes really carefully.

 I put some at my lower lash line too to create a more volume effect.

 Using a white pencil liner, apply it on your inner rims to brighten up those eyes.

 And here are some photos of the result!


When you're done with your eye makeup, continue on with the rest of your face...
 

 I applied a very mild pink blush and paired it with a bright, bold pink lipstick.
And that's it! I'm ready to go out and shop! Haha!

That's all for this tutorial. I do hope this post kind of helped in its own little way. If you ever do this look, just ready your most trusted makeup remover because using a waterproof mascara for this look can make removing the makeup very difficult. Good luck! :P
Anyway, I'm open to do more tutorial posts so just comment below for requests!


Cheers!
DAWN