Heyyyy lovely readers!!!
Almost a month ago, I got a tweet from a dear friend to do a tutorial for this!!!
Tadaaaa!!
Here's her tweet:
As you can see, she asked for a Spider Lashes Tutorial but the title says I only did a Semi-Spider Lashes look. To tell you the truth, it was hard for me to leave my lashes all clumped up together. I just can't do it!! Haha! I don't find it attractive... I'm sorry. So I do hope that my dear friend, Neysa, would be contented with this look that I did for her and I hope you enjoy reading this post.
Spider Lashes is actually something one should avoid when doing her/his makeup. It's when your lashes get all clumpy and stick together looking like actual spider legs. But there are times that this look is sported usually in creative makeup or fashion runway looks.
So on to the tutorial! I want to do a video but I don't have a good video camera and my laptop webcam sucks. Oh well. This will be my first ever makeup tutorial so please be nice. Haha! :)
Start with a clean face!
Curl your lashes with your trusted eyelash curler
(Mine is a Shu Uemura Eye Lash Curler... it's been one of my makeup bestfriends for over 6 years now!).
Now for the key instrument for this look...
Get a mascara that volumizes and lengthens. If you don't have any that does both, you can use two mascaras that specializes in each.
I am using Benefit They're Real Mascara which I recently made a review about.
Apply a quick coat first.
Then concentrate at the base of the lashes to create more volume which will result to this...
And then when it dries, lengthen the lashes and apply 2 or more coats until satisfied... work your way to the corner lashes of your eyes... don't forget to put some on your lower lashes as well!
I added 2 more coats and got this result.
This is the most Spider-Lashes-Like look that I would do but can still pass off as something 'wearable'. But if you really want to make it look like SPIDER LEGS then go ahead and apply some more coats of mascara!
You don't really need to use this brush for this tutorial but if you don't want too many clumps, then, sure, comb away! :P
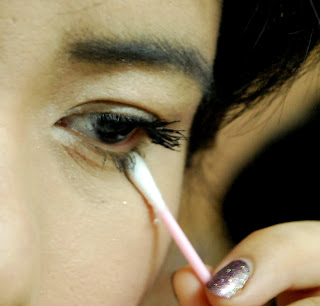
Using a cotton bud with makeup remover, clean up the messy areas.
I took out some of the flaky areas of my lashes using the comb. I have a feeling that those will eventually fall off and cause some smudging.
But of course, I wouldn't stop there! I'm just that too over-the-top sometimes. :P
Using a black pencil liner, tight line your eyes really carefully.
I put some at my lower lash line too to create a more volume effect.
Using a white pencil liner, apply it on your inner rims to brighten up those eyes.
And here are some photos of the result!
When you're done with your eye makeup, continue on with the rest of your face...
I applied a very mild pink blush and paired it with a bright, bold pink lipstick.
And that's it! I'm ready to go out and shop! Haha!
That's all for this tutorial. I do hope this post kind of helped in its own little way. If you ever do this look, just ready your most trusted makeup remover because using a waterproof mascara for this look can make removing the makeup very difficult. Good luck! :P
Anyway, I'm open to do more tutorial posts so just comment below for requests!
Cheers!
DAWN


It really makes a big difference when you put white or flesh-toned liner on the waterline.
ReplyDelete(BTW, already tried nars and I like it... a lot)
Hi Rae! True! That's why we searched high and low for those! Haha! I wanna try out the NARS too! Also the Chanel... Someday when I get rich (HAHA!), I will! :P
ReplyDeleteHay! What white pencil did you use? I have trouble finding one that stays on my lower lashline. Huhu!
ReplyDeleteHay! What white pencil did you use? I have trouble finding one that stays on my lower lashline. Huhu!
ReplyDeletegreat post! i'm still looking for the perfect white eyeliner that would suit my eyes. I want something that would brighten up my eyes but not too intense though
ReplyDeletehttp://confessionsofacanadianwallflower.blogspot.ca/
Chrissy - the colorIcon pencil from Wet N Wild. It doesn't stay long on the waterline but it's good enough considering the price.
ReplyDeleteVictoria - most matte white liners for the waterline usually are too intense. Why not try a nude liner? I super love those. :)